An Introduction to Arduino
Posted by Rhiannon L on
Table of Contents
Introduction
Using an Arduino for the first time can be overwhelming. You might be looking at this tiny device and wondering “what the heck is going on here!?”

Smaller than even the Raspberry Pi, an Arduino holds an incredible amount of technology. Arduino can connect to a wide range of tools to perform a variety of functions. It can connect to a temperature sensor to measure the temperature in a room, or produce sounds like an instrument, or even send a tweet from your computer! Despite its small size, it is an extremely powerful device.
In order to do all that it’s able to do, the Arduino has a variety of parts to it, including the circuits, the hardware (things you can touch, like the Arduino, wires, etc.), and the software (code, programs that make the Arduino perform a function).
Parts List
This series of posts will guide you through your journey with Arduino with simple, easy-to-follow projects to help you get the basics down. Today’s post is about helping you understand your Arduino and get set up. For this series of posts, you’ll need:
- Arduino Uno Rev3 (x1)
- 400-Tie Breadboard (x1)
- Arduino & Breadboard Holder (x1)
- USB Cable A-to-B (x1)
- Premium Splittable Jumper Wire (40 Pins M/M 10cm)
- Green LED 5mm (x5)
- RGB LED 5mm (x1)
- Photo-resistor (x1)
- 330Ω Resistor (x5)
- 10kΩ Resistor (x5)
- 10kΩ Potentiometer [POT] (x1)
- Push Button / Tactile Switch (x2)
- Transistor PN2222 (x1)
- Temperature Sensor TMP36 (x1)
- Buzzer (x1)
- DC Motor (x1)
- Discovery Kit (Lite) Guide (x1)
Now that you have all you need, let’s make sure we understand what exactly is going on with the Arduino.
Understanding Your Arduino Board and Breadboard
There are several different components to the Arduino that you must understand. Two of the most important physical parts are the Arduino board itself and the breadboard (both of which are included in the parts list listed above).
Arduino
Here is an image of an Arduino, with all the input and output ports and other important components labelled. Take a moment to locate the input/output ports on your Arduino Uno.

- Power In (5.5 x 2.1mm Barrel Jack) - Can be used with either a 9V-12V wall-wart or battery.
- Power In (USB Port) - Provides power and communicates with your board when plugged into your computer via USB.
- LED (RX: Receiving) - This shows when the Arduino is receiving data (such as when it is being programmed).
- LED (TX: Transmitting) - This shows when your Arduino is transmitting data (such as when it is running a program).
- LED (Pin 13: Troubleshooting) - This LED is incorporated into your sketch* to show if your program is running properly.
- Pins (ARef, Ground, Digital, Rx, Tx) - These pins can be used for inputs, outputs, power, and ground. Pins 3, 5, 6, 9, 10, and 11 - These six digital pins can be programmed for analog output.
- LED - This LED indicates the Arduino is on.
- Reset Button - This is a way to manually reset your Arduino, which makes your code restart.
- ICSP Pins (Uploading Code without Bootloader) - This is for "In-Circuit Serial Programming," it is used if you want to bypass the boot loader.
- Pins (Analog In, Power In, Ground, Power Out, Reset) - These pins can be used for inputs, outputs, power, and ground.
* Sketch: what Arduino calls a program. Sketches are written in the Arduino IDE, which we will talk about later, and uploaded to the Arduino to be run.
The header pins (shown in the following diagram) are one of the most important parts for putting our example circuits together.

Breadboard
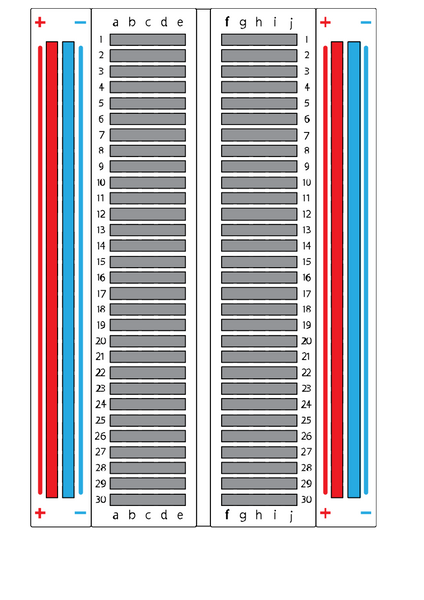
This is a diagram of a breadboard. Refer to the description of parts underneath to help you understand.
Power Rail: Each + sign runs power anywhere in the vertical column.
Ground Rail: Each - sign runs to ground anywhere in the vertical column.
Horizontal Rows: Each of these rows, numbered 1 - 30, are comprised of five horizontal sockets. Components placed in the same row will be connected in a circuit when power is running. For example, A1 is connected to E1 but not connected to A2 or A5.
Using Arduino
In order to get your Arduino up and running, you’ll need to download the Arduino IDE (Integrated Development Environment). Arduino IDE is an editor for writing programs. It will allow you to code the Arduino to do exactly what you want.
1. Download the IDE
Go to the Arduino website. Depending on the OS (Operating System) you have, download the latest IDE (not the BETA) under “download”, in the middle of the page. Download it into the folder it goes in automatically, or a folder of your choice.
2. Connect your Arduino to your Computer
Use the USB A-to-B cable (included in the parts list listed above, or any other USB A-to-B cable) to connect the Arduino to one of your computer’s USB inputs.

3. Install Drivers
Windows - Windows will try to install a driver for the Arduino by itself, but the process will fail. That’s alright because Windows doesn’t have the Arduino driver. To install the driver, you’ll have to manually find it for Windows. Go here for more instructions.
Apple - No driver is needed, but you can go here for more details.
Linux - Go here for more instructions.
4. Open the Arduino IDE
Open the Arduino IDE software, arduino.exe, on your computer in the folder where you installed the Arduino software. Make sure to get familiar with the interface because this is where you’re going to write all the code for your Arduino projects.

-
Verify: Compiles and approves your code. It will catch syntax errors (like missing semicolons or parentheses).

- Upload: Sends your code to the Arduino board. When you click it, you should see the lights on your board start blinking rapidly.
- New: Opens up a new project window.
- Open: Lets you open a sketch that you have saved.
- Save: Saves the currently active sketch.
- Serial Monitor: Opens a window that displays any serial information your Arduino is transmitting. It is very useful for debugging.
- Sketch Name: Shows the name of the sketch you are currently working on.
- Code Area: The area where you write the code for your sketch.
- Message Area: Where the IDE tells you if there are any errors in your code after you click Verify.
5. Identify the Arduino Board
Now that we’ve downloaded the IDE and plugged in the Arduino, we have to make sure your computer can see your Arduino.
First, go to Tools (at the upper left corner of your IDE). Under Board, select the type of Arduino board you’re using. If you’re using the kit, select Arduino Uno. If you are using another board, select it here.

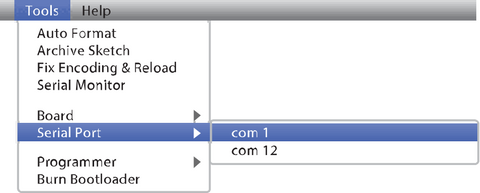
Then, select the serial port that the Arduino is connected to:
Windows - Select the serial device of the Arduino board from the Tools > Serial Port menu. This is likely to be COM3 or higher (COM1 and COM2 are usually reserved for hardware serial ports). To figure out which one it is, you can try disconnecting your Arduino board and re-opening the menu; the option that disappears should be the Arduino board. Reconnect the board and select that serial port.
Apple - Select the serial device of the Arduino board from the Tools > Serial Port menu. On the Mac, this should be something with /dev/tty.usbmodem (for the Uno or Mega 2560) or /dev/tty.usbserial (for older boards) in it.

Linux - Go here for more instructions.
6. Set Up the Arduino and Breadboard Holder
You’re almost done setting up your Arduino! All that’s left for you to do is secure the Arduino and the Breadboard to the holder (provided in the parts list listed above). Follow the diagram closely.
* If you’re trying our projects, it may help to orient your board the way it’s shown in the diagram, as this is the orientation used in our project diagrams.


5V Current. Your Arduino runs on five volts. 5V can’t hurt you, so don’t be afraid to touch anything in your circuit. This is the power that will be supplied from your computer via USB and will be the driving force behind any components you use in your circuits. By plugging your Arduino board into your computer, you are supplying it with just the right voltage it needs to thrive!
7. Start Building and Coding!
Now you’re ready to start building and coding! Project 1: Airplane Strobe Light is a simple project and the perfect next step. Our projects come with easy-to-follow diagrams to guide you through putting together the components and sample code that you can write, with explanations throughout, so be sure to check them out at our Learn page.
I hope this has been helpful in helping you set up your Arduino. If you have any questions, leave a comment below.