MIT app inventor; Arduino – Control CAROBOT Via Bluetooth
Posted by Saya H on
In this article, we will explain how to use the MIT APP INVENTOR using the example of the Car robot from a previous post in which we learned how to program and control a robot through Bluetooth.
The MIT APP INVENTOR is an easy-to-use cloud-based application that allows us to quickly develop an android application. We’ll use it to create a controller app for the robot.

Go to the MIT App Inventor website and press “Create Apps!” to start our project :)

After naming the project, we are going to design the layout of our app. The designer gives you the ability to add buttons, text, screens and edit the overall look of the app.
First, we will create some buttons for each of the directions (Forward, Backward, Right and Left, STOP) and for BlueTooth connectivity ('Connect,' and 'Disconnect.')
Once you enter the project, on the left side, you will see the ‘Palette’ that shows you materials that are useful to build the application. You can expand each group for more details on the components by clicking on each category title.

In the middle, there is a Viewer section that shows what the screen will look like.
You can switch the size of the screen from Phone, Tablet, and Monitor.

Let’s move on to the design!
Select ‘Layout’ from the Palette then drag and drop a ‘Horizontal Arrangement’ to the Viewer.


The moment you added a component in the Viewer, you will see it on the ‘Components’ section on the right-hand side.
In the ‘Properties’, of the “HorizontalArrangment1”, click on the selection box under ‘Width’ and choose ‘Fill parents’ so it’ll fit the entire screen then click OK.

The term ‘Parents’ means where the component is located, for this case, ‘Screen1’ is the parent of the Child, ‘Horizontal Arrangement1’.
That is why its width will expand up to the width of Screen1.
Next, add a ‘label’ and a ‘button’ component into the ‘HorizontalArrangement1’ box on the viewer in the same manner. We’ll use the label component to help us with positioning the button component.
For the label component, delete the text and set the width to 95 pixels so the button will sit nicely in the center of the viewer. Adjust the pixel value if it is not at the center of the screen.

Now, in the button properties, rename the button to “Connect”.
Continue to place text boxes and buttons until you end up with a remote control design that you like (see photo below for reference). Remember to rename and provide a meaningful name for each button so it is easy to recognize, such as ‘Connect’, ‘Forward’, ‘Backward’.
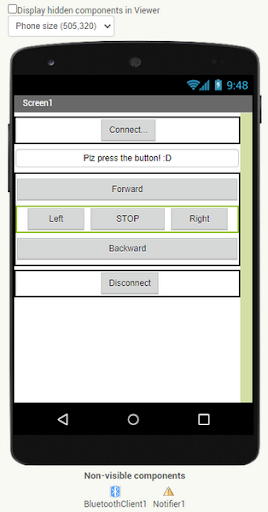
You can change the layout by arranging the position and text design to make it look nicer.
At the bottom of the screenshot above, you will see a BluetoothClient1 and a Notifier1 component, which we’ve added from the ‘Connectivity’ Palette.
The BluetoothClient allows us to use a Bluetooth connection and the Notifier component displays alert messages and creates Android log entries through various methods.
Once you are done with designing the layout, it's time to build the block code! Click the "Blocks" button at the upper-right corner to create custom functionality for your app.
The Notifier component displays alert messages and creates Android log entries through various methods.

On the left-hand side, you’ll find a list of block categories that will show the components related to it when you click on each title.

Let’s build the blocks to complete our programming!
First, we’ll build the Bluetooth connection for the app. Create the following program in the block viewer.

The code above allows the user to select a Bluetooth connection to receive data. If it cannot, for any reason, then there will be a pop-up alert message on the screen.
Below are the blocks for each direction button. When a button has been clicked, it will send a letter to direct the robot through Bluetooth.

Each letter is for the case we’ve programmed into the Arduino earlier in the previous post. After receiving the letter which is char byte through Bluetooth, they will be separated by the case and implemented.
Once you are done, click the build button to export this program, and it will provide you with two ways to install the app.

- You can generate a QR code that you can scan and automatically install the app on your smartphone; or
- You can download the .apk file, connect your smartphone to your computer and move the .apk file onto the phone.
If you want to try our program, you can download it by scanning the QR code below with an Android device and installing the application.

Or you can download our apk file from here.
Once we open the application, it looks like this.

And now, you can operate and control the robot through the app!

Pair your Android device with the Bluetooth module on the robot.
Open the app and press the "Connect" button and choose the robot’s Bluetooth module to connect with.
Control the robot by pressing the direction buttons.
Press "Disconnect" to finish.